The Earth Module (TEM)
Firmware Version 1.2.0
Listening to Earth’s Voice
Overview
The Earth Module (TEM) is a Eurorack module that retrieves real-time environmental data (weather, celestial, and space weather) from Earth and converts it into CV/Gate signals. Natural changes such as temperature, humidity, wind speed, and moon phases become musical modulation elements, allowing you to experience unity with Earth through sound.
Important Notices
• This module operates using Wi-Fi networks. 2.4 GHz band Wi-Fi environment is required (5GHz band not supported)
• A free account with OpenWeather and API key acquisition is required
• Due to the nature of network communication, there is a certain delay in signal value updates. When weather is stable or due to communication conditions, CV output may not change for a while, but this is not a malfunction
• As it incorporates a Wi-Fi module, noise may appear in the output depending on the environment (this is intentionally preserved)
• TEM is an experimental module. It is designed for use in a proper Eurorack power environment
Technical Specifications
| Item | Specification |
|---|---|
| Format | 6HP (30.0mm) x 3U (128.5mm) x 26mm Eurorack |
| Power | +12V: 50mA / -12V: 0mA / +5V: 0mA |
| Connectivity | Wi-Fi (2.4GHz) |
| Outputs | 2x CV (Weather, 0-5V), 2x Gate (Conditions, 0-5V) |
Package Contents
- TEM module (ESP32-C3 based)
- Power cable
- QR code sticker (for setup)
Required Environment
- WiFi Environment: 2.4GHz band support required (5GHz not supported)
- OpenWeather API Key: Available for free
- Setup Device: Smartphone, tablet, or PC
Initial Setup
1. Module Startup
- Connect the TEM module to your Eurorack case power
- Indicator lights up and startup sequence begins
- Wait approximately 2 minutes and confirm indicator turns red
During startup, the following sequence is executed over approximately 2 minutes:
- Black - Immediately after power-on
- Blue (breathing) - WiFi connection processing
- Pink (solid) - WiFi connection failure
- Orange (solid) - AP mode or API key not set
- Green (solid) - API key configured, waiting for data acquisition
- Cyan (solid) - Normal operation
2. WiFi Configuration (First time only)
For iPhone:
- Open Settings app and tap “Wi-Fi”
- Search and select “TheEarthModule_XXXX”
- XXXX is the individual 4-digit ID (e.g., 2a3b)
- Browser will automatically open upon connection
In iPhone WiFi settings, “TheEarthModule_XXXX” will appear in the list of available networks. XXXX is a unique 4-digit ID specific to each unit, printed on the back of the device. When selected, a captive portal will automatically open, displaying the configuration page.
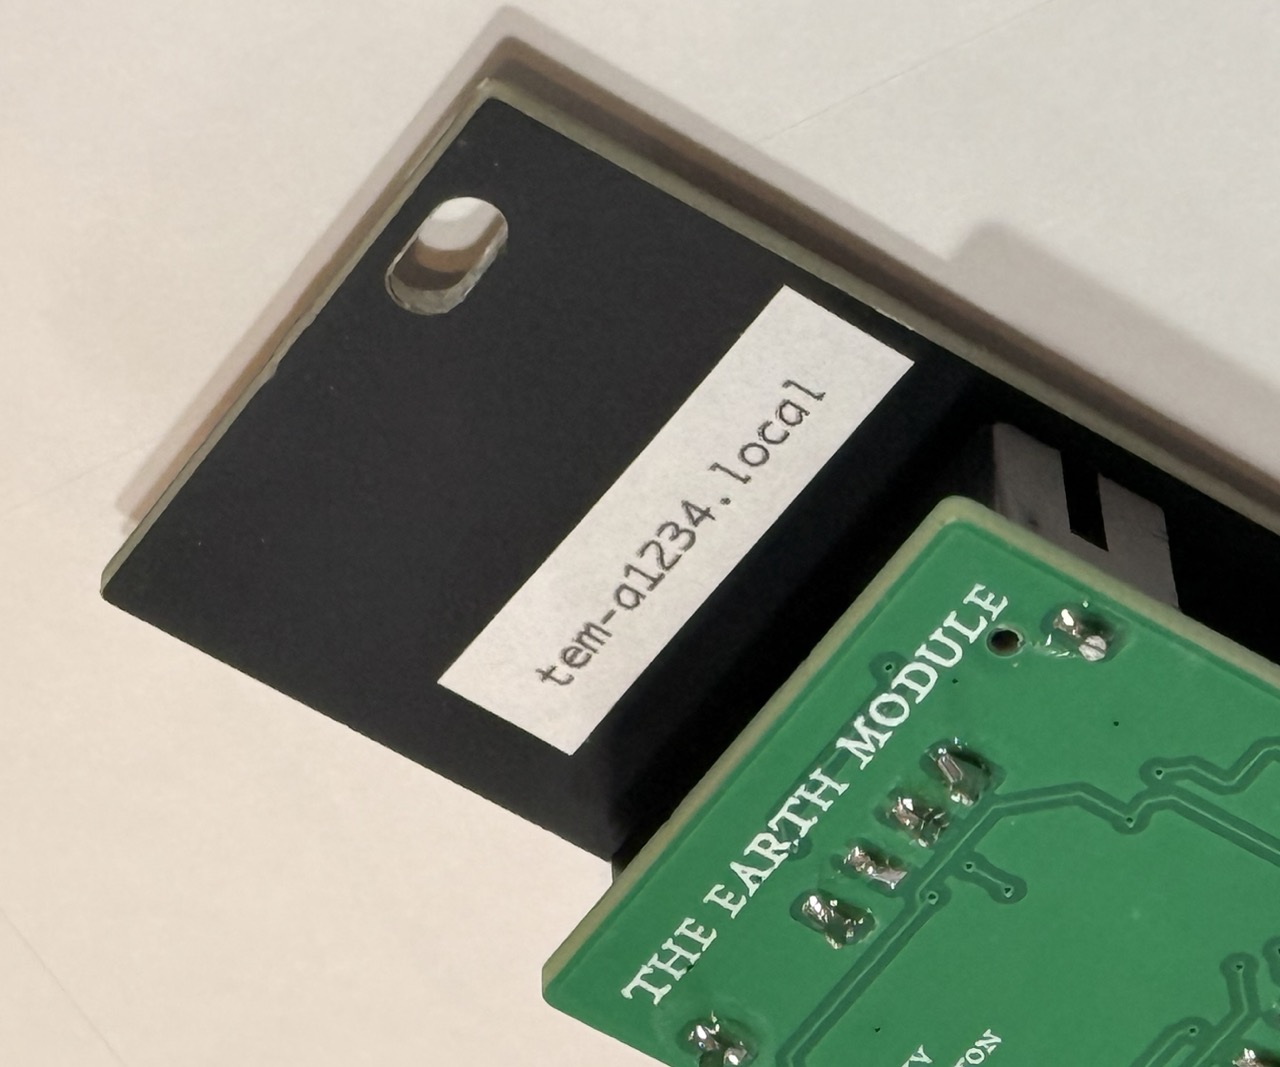
The individual ID is printed in the format “TEM-XXXX” on the upper part of the label on the back of the device.
For Android:
- Open “Wi-Fi” from Settings
- Search and select “TheEarthModule_XXXX”
- Browser will automatically open upon connection
- If it doesn’t open automatically, access
192.168.4.1in browser
- If it doesn’t open automatically, access
On Android, select “TheEarthModule_XXXX” from WiFi settings. After connection, the browser will open automatically, but if it doesn’t, manually access 192.168.4.1. Captive portal behavior may vary depending on the Android device.
WiFi Configuration Page:
- Enter SSID and Password of the WiFi network to use
- Click “Connect” button
- Module automatically restarts and LED changes to blue
The WiFi configuration page features a simple form where you enter the SSID (network name) and password. Clicking the “Connect” button will attempt connection to the specified network, and upon success, the module will automatically restart and switch from AP mode to normal mode.
3. WebUI Access
After WiFi configuration is complete, access using one of the following methods:
Recommended: http://tem-XXXX.local (XXXX is the individual ID)
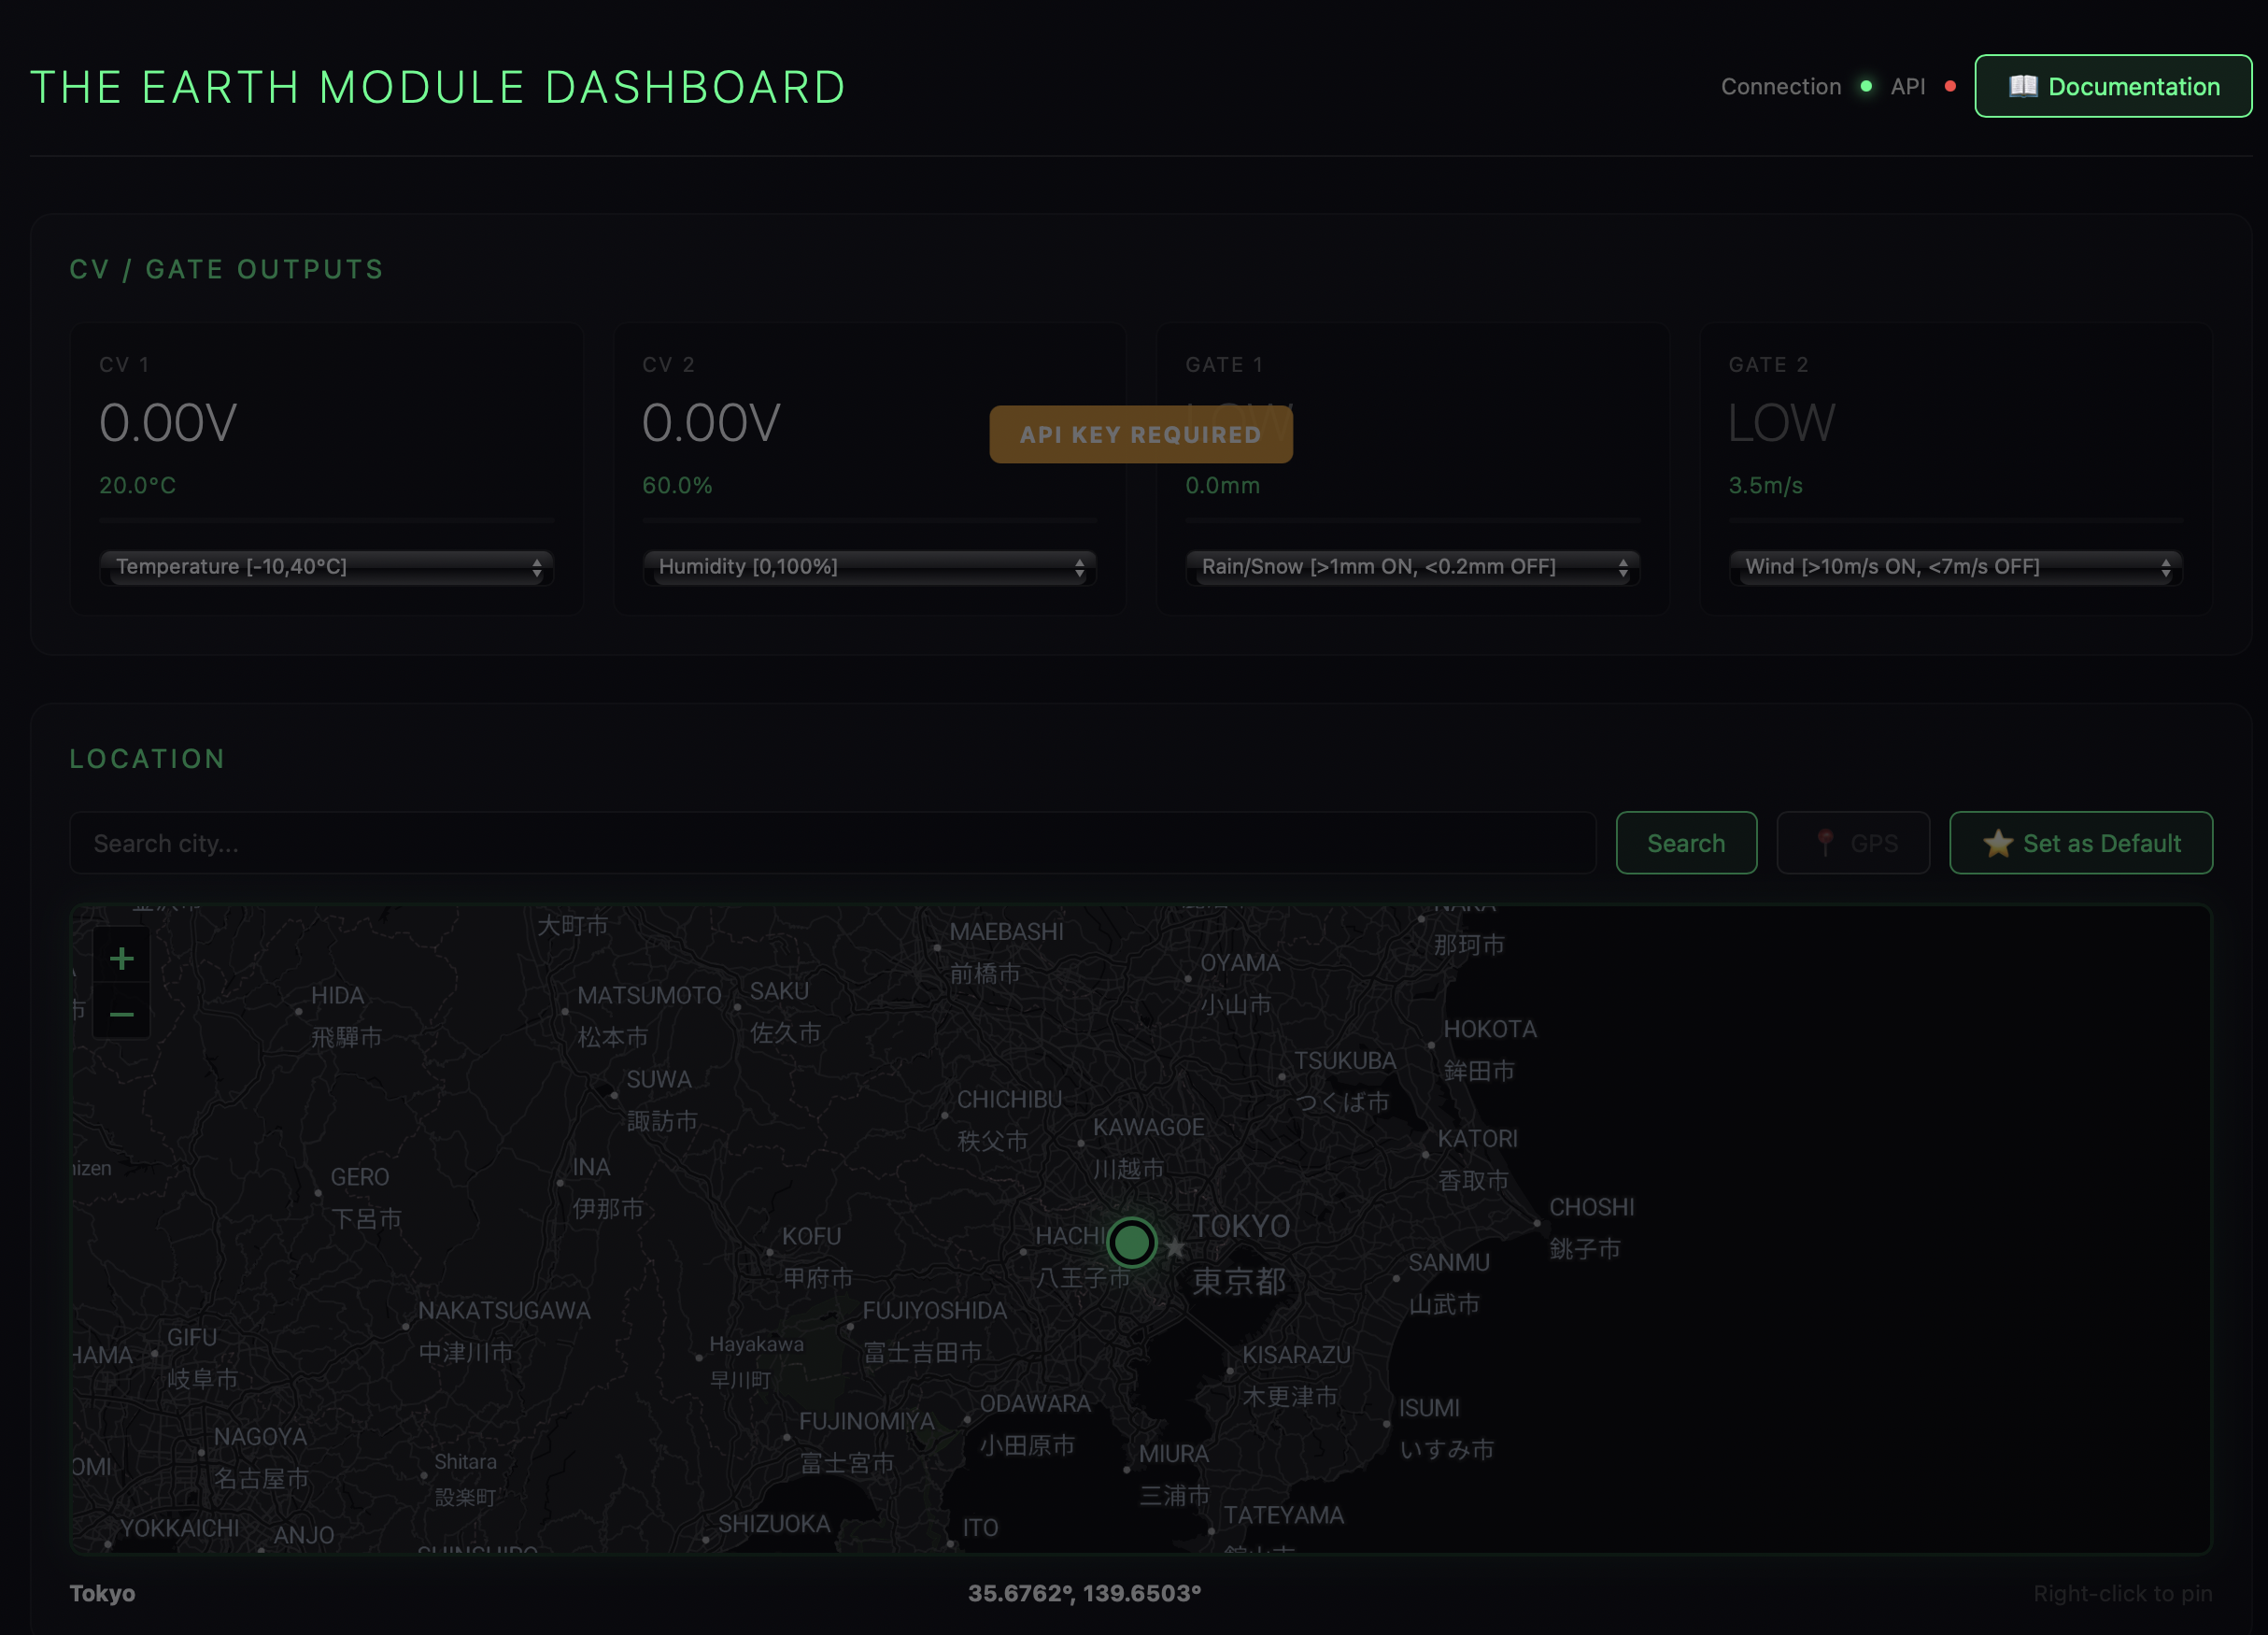
The WebUI main screen displays an integrated dashboard featuring real-time weather data, CV/Gate output settings, LED status display, and location information configuration. Firmware update notifications and help links are positioned in the upper right corner of the screen.
OpenWeather API Key Configuration
API Key Acquisition
- Access OpenWeather API
- Create a free account through “Sign Up”
- Copy the key from “API keys” tab in account settings
- Free plan has 1,000 requests/day limit
- TEM is optimized for 288 requests/day
The OpenWeather signup page requires entering an email address, username, and password to create an account. The free plan allows 1,000 API calls per day, and TEM operates optimally with 288 requests per day, providing ample margin.
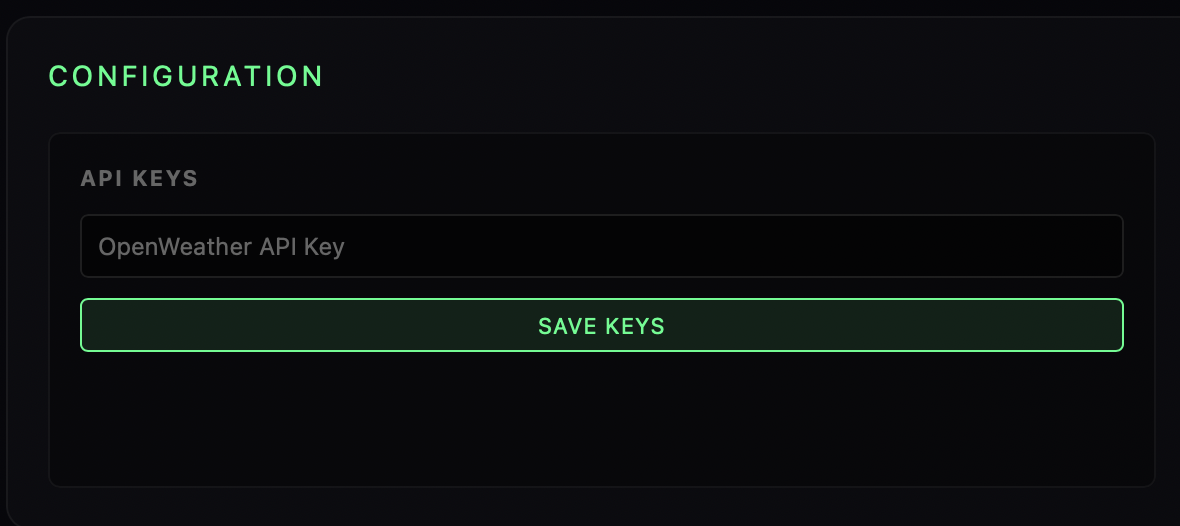
API Key Configuration
- Access TEM WebUI
- Enter the key in “API Keys” field in “Configuration” section
- Click “Save Keys”
- Confirm indicator changes from orange to green
In the API key configuration screen, paste the API key obtained from OpenWeather into the input field and save it with the “Save Keys” button. Upon successful saving, the indicator will change from orange to green, and weather data acquisition will begin.
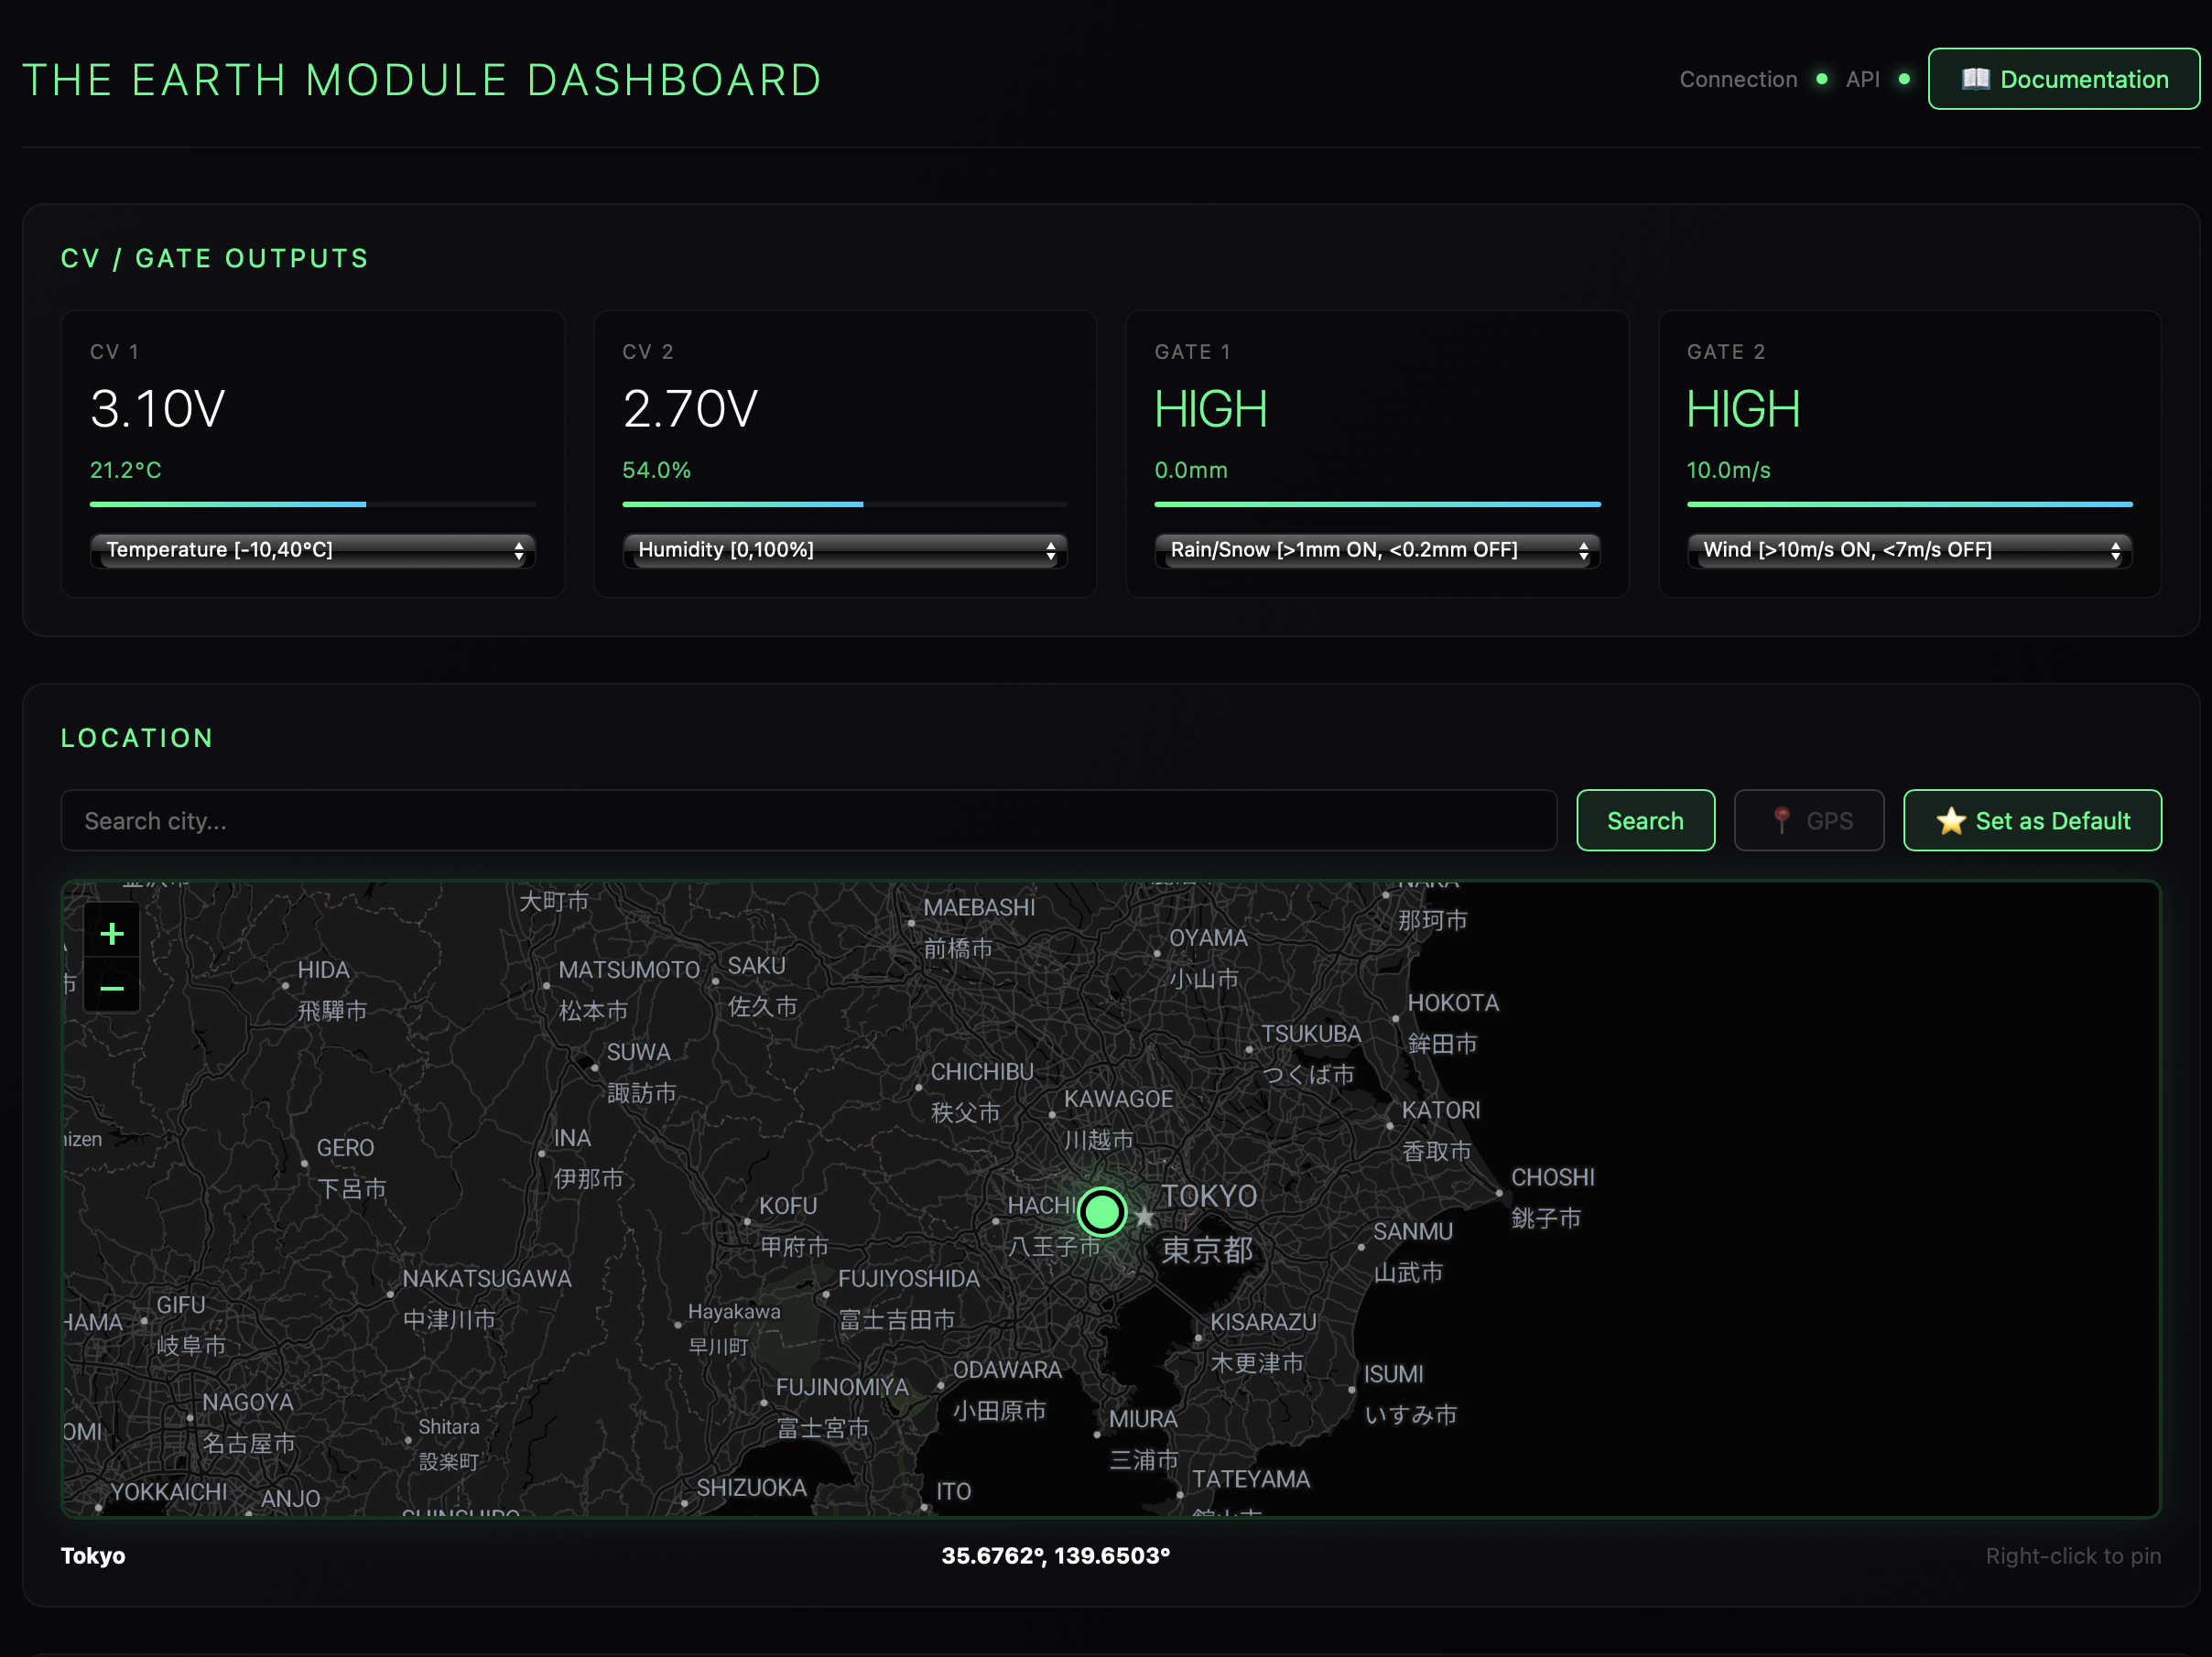
After API key configuration, the full operation state displays real-time weather data and active CV/Gate outputs.
Location Configuration
- Display map in WebUI’s “Location” section
- Set location using the following methods:
- Click: Click anywhere on the map
- Right Click: Fix position and start data acquisition
- Search: Enter city name to search
- GPS: Use 📍 button to get current location (HTTPS required)
- Save position with “⭐ Set as Default”
Location configuration features an interactive map using Leaflet. You can select locations by clicking on the map, confirm with right-click, search city names, and acquire GPS location (HTTPS connection only). The configured location is saved in the browser.
CV/Gate Output Configuration
Available Parameters
Weather Data
- Temperature: -10°C〜40°C
- Humidity: 0〜100%
- Pressure: 950〜1,050hPa
- Wind Speed: 0〜20m/s
- Cloud Cover: 0〜100%
- Visibility: 0〜10km
- Dew Point: -20°C〜30°C
- UV Index: 0〜11+
Celestial Data
- Moon Phase: 0〜1 (New moon〜Full moon)
- Solar Elevation: -90°〜90°
Space Weather
- Solar Wind: 250〜800km/s
- Kp Index: 0〜9
Gate Logic
- Rain/Snow: ON at 1mm or more, OFF below 0.2mm
- Wind: ON at 10m/s or more, OFF below 7m/s
- Day/Night: ON at solar elevation 0° or more, OFF below -5°
- Storm: ON at Kp index 5 or more, OFF below 4
Output Configuration
- Open “CV / GATE Outputs” section in WebUI
- Assign parameters to CV1〜CV2 and GATE1〜GATE2 respectively
- Settings are automatically saved and reflected in real-time
The CV/Gate output configuration screen allows assigning weather parameters to each of the four outputs (CV1, CV2, GATE1, GATE2). Selections from dropdown menus are immediately reflected, and current values are displayed in real-time.
Indicator Status Display
Indicator displays current status with the following colors:
Normal Operation Status
| Color | Status | Pattern | Details |
|---|---|---|---|
 Blue |
Normal Operation | Solid | WiFi connected, weather data acquired |
 Green |
Data Standby | Solid | WiFi connected, API key configured |
 Orange |
API Key Required | Solid | WiFi connected, API key not set |
Processing Status
| Color | Status | Pattern | Details |
|---|---|---|---|
Blue |
Connection Processing | Breathing | WiFi connection in progress |
Blue |
Data Acquisition | Breathing | Weather data acquisition in progress |
Error Status
| Color | Status | Pattern | Details |
|---|---|---|---|
 Pink |
WiFi Connection Failed | Solid | WiFi connection error |
 Magenta |
API Error | Solid | API communication error |
Setup Status
| Color | Status | Pattern | Details |
|---|---|---|---|
Orange |
Initial Setup Mode | Solid | AP mode, initial setup mode |
Indicator Operation Patterns
Operation Flow:
- Startup: Orange → Blue breathing (WiFi connecting)
- WiFi Success: Green (API key confirmation)
- Data Acquisition: Blue breathing → Blue (normal operation)
- Error: Pink (WiFi failure) or Magenta (API failure)
Runtime Operation Patterns:
- Normal: Blue solid for stable operation
- Data Update: Blue breathing every 5 minutes → returns to blue solid
- Error Occurrence: Corresponding error color (Pink/Magenta) for status indication
Firmware Updates
Update Notifications
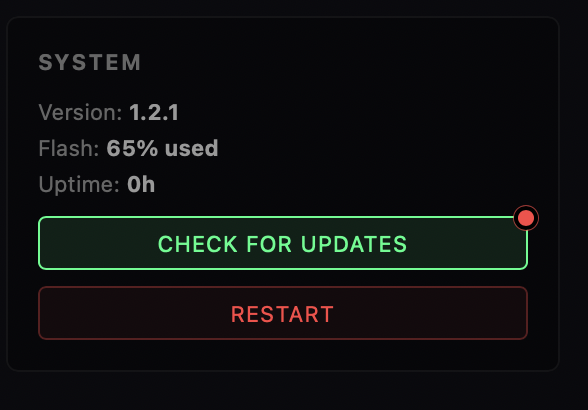
- Red dot for updates appears in upper right of WebUI
- Manual check also possible with “Check for Updates” button
Using Updater
- Click “Check for Updates”
- Confirmation dialog appears when new version is available
- Click “OK” to open Updater
- Follow on-screen instructions to update firmware
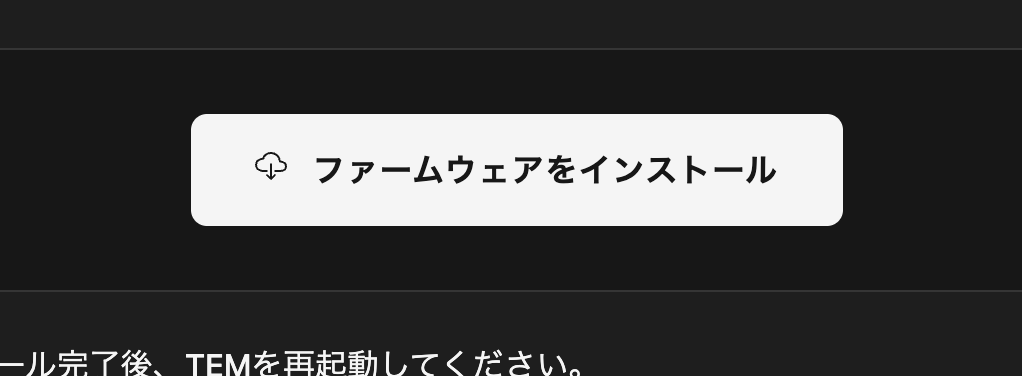
The Updater is a browser-based firmware update tool using Web Serial API. It connects directly to the ESP32-C3, automatically downloads the latest firmware, and writes it.
Update Procedure:
-
Installation Confirmation
 Click “Install TEM (The Earth Module)”.
 -
Updater Main Screen
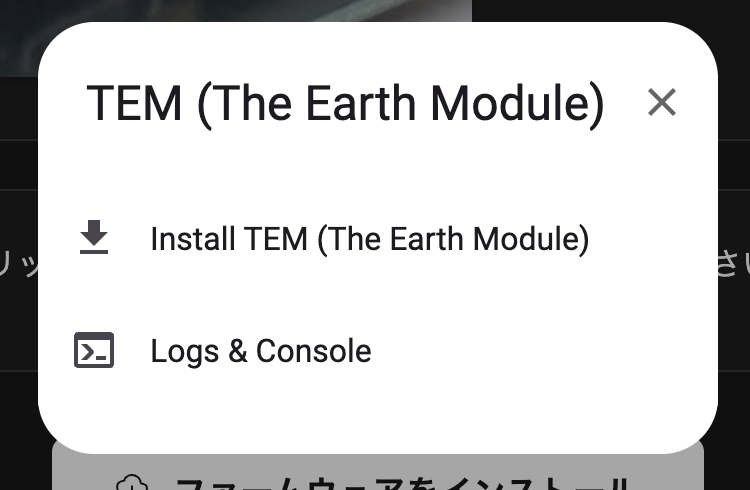 Click “Install TEM (The Earth Module)”.
 -
Device Connection Confirmation
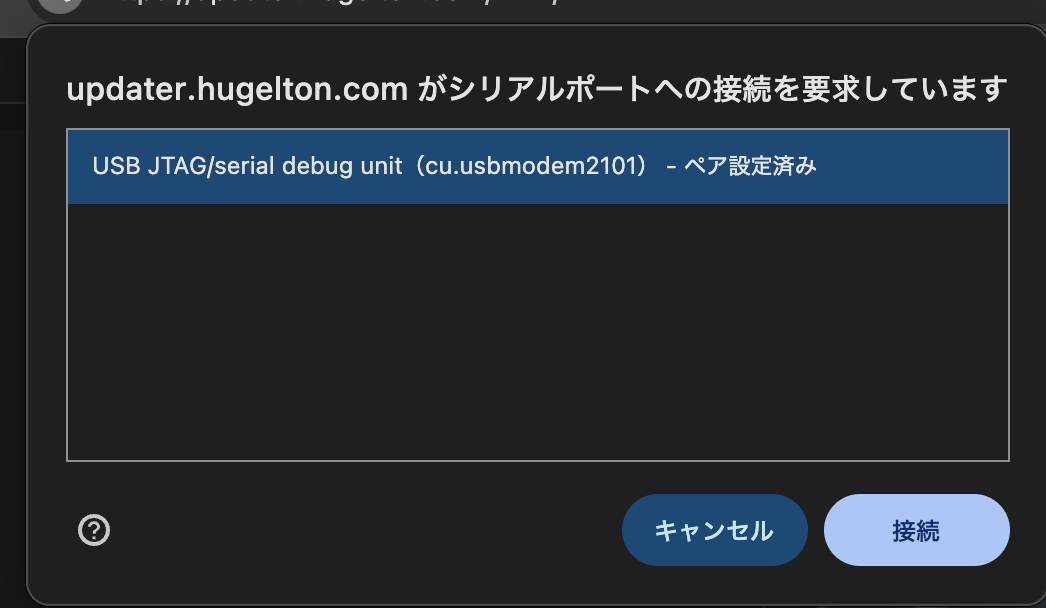 Select the TEM device in your browser.
 -
Installation Execution
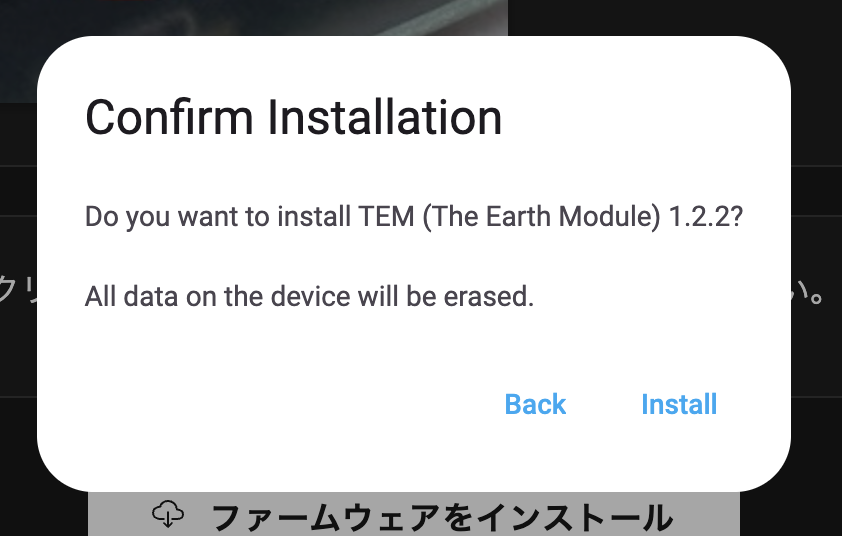 Select “INSTALL” in the confirmation dialog to begin firmware writing.
 -
Progress Monitoring
 During updates, a progress bar and detailed logs are displayed.
 -
Completion Confirmation
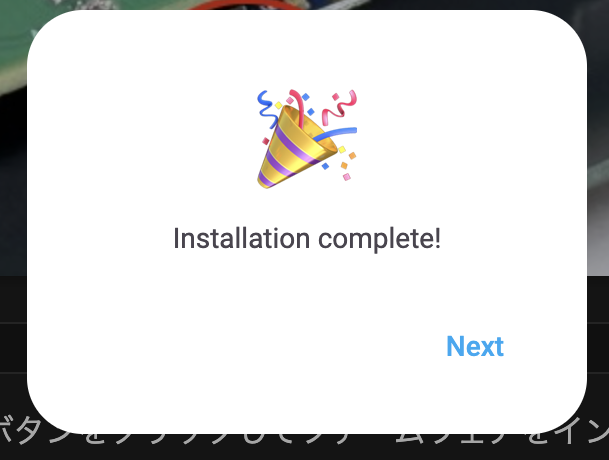 A completion message is displayed when installation succeeds.
Important Notes
- Do not turn off module power during updates
- Settings are retained after updates, but verification is recommended
- If problems occur, manually reconfigure API key and location information
Troubleshooting
Cannot Connect to WiFi
- WebUI: Check SSID and password on WiFi configuration page
- Cause: Using non-2.4GHz band network
- Solution: Use 2.4GHz compatible network
Weather Data Not Updating
- API Key: Verify correct entry
- Internet: Confirm connection is normal
- Update Interval: Wait as updates occur every 5 minutes
- LED Check: Reconfigure API key if LED doesn’t turn white
Cannot Access WebUI
- mDNS: Access with
http://tem-XXXX.local(XXXX is individual ID, printed on device back) - Browser: Clear cache and retry access
Settings Reset
- Firmware Update: Settings normally retained
- Full Upload: “All Flash Contents” erases settings
- Backup: Recommended to note API key and location information
UI Elements Cannot Be Operated (Grayed Out)
- API Key Not Set: Orange “API key required” display
- Device Disconnected: Red “Device disconnected” display
- Solution: Configure API key or confirm WiFi connection
Feedback and Support
Please share your opinions, feedback, bug reports, feature requests, and more through the following channels:
The Earth Module - Listening to Earth’s Voice